If you want to examine the material in a particular Market, select the "Market" segment, using the "Market" button above. Select the Markets button to return to original page. Other links will take you to other destinations.
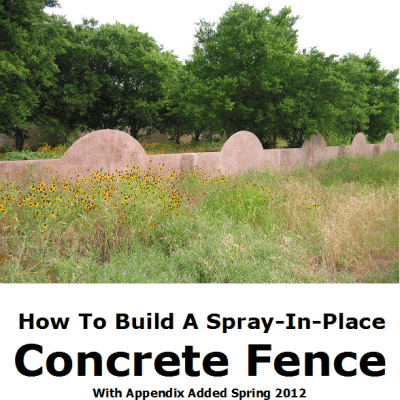
Sprayed walls
(or Built-up Plastered walls).
A "spray-in-place" wall can be constructed using StoneRod rebar, and StoneRod fibre mesh. The rebar is used to reinforce the corner posts, and the StoneRod 25 mm x 25 mm mesh is recommended for the walls, as it is easy to handle, and is stiff enough to self-support during placement. The sprayed wall concept was developed by Monolithic.org and a free download of the method is available on their website. Right up front, we confess, this section is pure "plagarism!" Please don't expect the wheel to be re-invented. The information is available in a form that you can print out and use in practice.
Thanks are given to David South of Monolithic.org for his willingness to freely share his knowledge. All the drawings and photographs have been supplied by Monolithic.org. Please note that the 26 page booklet is written for the USA market, and uses feet and inches. Some drawings and information have been lifted, modified to suit metric measures, and placed on this site. You can download the "FREE" book by going to Monolithic.org/media and looking for the section called "Spray-in-place-concrete-fences-how-to-get-just-the-look-you-want"! On that page, scroll down to find the link.
Please read the book!
The book gives full directions on the production of a spray-in-place concrete wall. It comprehensively describes the method of construction. However, please remember that dimensions are given in imperial measures. (Feet, inches, gallons, etc.) The walls can be built with a mortar pump, smallish air compressor, and a spray head. It isn't necessary to have a state-of-the-art wet shotcreting machine, quite simple equipment may be used. However, if there is no access to sprayed concrete equipment, the mortar wall can be built of a layered plastered mix. You will have to choose your procedure.
In the booklet, the section in Chapter 4, talks about fixing rebar to the inside of the shutters (Pages 13 and 14). Later, methods are given in the Appendix - Pages 25 and 26) which show that the descriptions given in Section 4, have been superceded. The walls can be produced with StoneRod fibre mesh. Not using rebar avoids the necessity of respraying the shutter-side of the wall, after the shutter has been removed. Extra spraying is required as the rebar is on the surface, if you want to go the rebar route, and use that method. But remember, thin skinned walls will crack and spall once the steel rebar starts to rust. Use basalt rebar if you want to use rebar. It costs extra time and effort, using rebar, though.
 |
A few modifications have been suggested, as the publication was first released before basalt rebar and mesh became available. Since steel rusts when carbon dioxide penetrates into the concrete, the use of rebar and certain thicknesses of concrete were necessary to provide sufficient cover for the rebar. Cover is the distance from the surface of the concrete to the outside of the rebar, and normally this has to be 50 mm minimum, per side. When using basalt, this requirement falls away as the basalt materials will not rust or corrode. However, for stability, a suggested 50 mm thick wall is the minimum advisable.
After you have read the booklet, take note...
Whenever a fence is built, it should be ascertained where the property line is, or at least, exactly where the fence is to be constructed. If the fence is between two property owners it is best to have an agreement on what the fence is to be like, how it should be laid out, and who is to pay for, and install it. The property laws, which include fences, vary from place to place, so if you don’t get an absolute agreement with your neighbour, it is probably best that you check with an attorney to see what your legal options are.
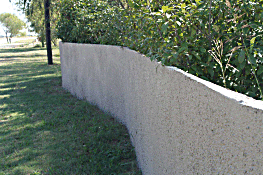
Obviously, before you construct a wall, some planning will have to be done. If a zigzag wall is envisaged, (RECOMMENDED), and it will span across the property line, approval of your neighbour, in writing, is a pre-requisite. In addition, if you are living in a municipal area, or where certain building requirements, and regulations, are in place, it is essential to get the correct approval.
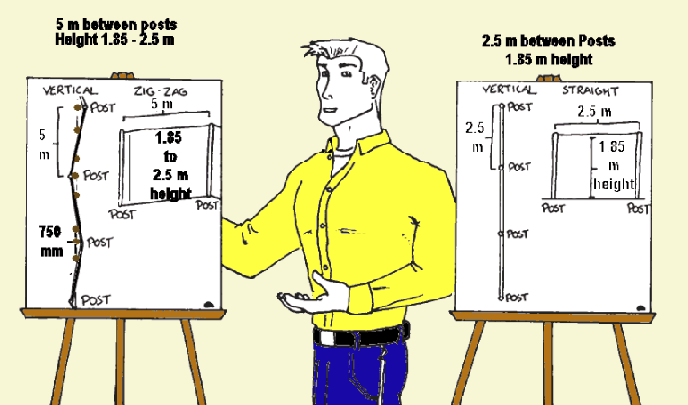 |
During planning remember to design the layout so it does not hinder future plans, remodelling, or expansions. For instance, if there is no exit to the back garden, or lot, and some day you want to build a swimming pool there, you will find it very difficult to go through the concrete fence. Therefore, a gate would be in order. Fences perform many functions, not the least is to "keep them out" and "us" in.
"Them" can be animals, people, wind, sand or "snow drifts" (Unlikely, in most of South Africa!). "Us" usually consists of the residents, employees, and the pets of the home. An appropriate fence height needs to be established. Here again it is wise to check your local city ordinances. In many places a fence over one metre tall, in the front of the house, is not allowed.
In recent years, these laws have relaxed in South Africa, where the bulk of the "moneyed people" now live in compounds, behind 5 metre high security fences, with razor wire, electric fencing deterrents, land-mines, pit bull dogs, and hair trigger, automatic-weapon armed, SWAT teams, that are there to protect their privacy.(TIC).
It isn't quite so bad for us, who are ordinary people. However, in other places, a fence has a maximum height, at the rear of the property, of about 2.5 metres. You will find that the fence ordinances could vary, from one location to the next. Previously, a 2 metre fence was acceptable for everything, except front yards, where high walls could be hazardous to motorists, such as is found on a corner lot. The best choice is get the local rules, and abide by them.
Costs!
Let's get this out of the way, right now! To build an attractive suitable wall is going to cost you some money. It is important to realise that there are specialised techniques that will need to be taken into account. Yes! Building a 2.5 metre wall is possible for a practical, "Do it Yourself man in the street". However, for the sake of practicality, and speed, this job should be done by a competent contractor. A specialised pool builder or "Guncrete" expert will find constructing these walls just a "walk in the park"! They have already got access to post-hole augers, concrete spraying equipment, concrete mixers, and the myriad of other pieces of specialist equipment, which may be required. Yes! you can build thin skin plaster walls, but you will need a good quality plasterer. (See end of this page).
But we are here to discuss the erection of a suitable wall! The spray-in-place concrete fence is amazingly versatile. There are many creative options for layout and design. Take a little time to read David's booklet, plan properly, and once you have considered the needs of you, and your "good neighbour', start executing your plan.
 |
 |
 |
|
 |
 |
 |
The mix design given in the book has been adjusted to metric sizes. (Pages 19 -20) The amounts have also been calculated to give a cubic metre of wet shotcrete. The use of a suitable shotcrete admixture and silica fume is recommended. The booklet's recommended mix is 370 kg of CEM II 42.5 Portland cement, about 165 litres of water (depends on admixture) and 1640 kg of good quality plaster sand (about 1.2 m3). Two mix designs that have been published for wet and dry shotcrete have the following quantities. Wet: Cement 420 kg, Silica Fume 40 kg, Sand 1610 kg, Superplasticiser coupled with a water reducing agent 8 litres. Dry: Cement 420 kg, 50 kg Silica fume, 1680 kg Sand.
Dry mixes have higher rebound and the loss can go as high as 20%, if the silica fume is omitted from the mix. Even wet shotcrete has rebound losses, so do not be surprised if the quotes you get, from professional applicators, make the walls seem expensive. The big advantage is that you have a sturdy wall that can add value to your property.
Please - READ THE APPENDIX to the booklet. It is important!
In the Appendix, David describes the move, in America, towards Basalt Rebar and Basalt fabric mesh. It is seen as a more advanced construction method. In South Africa, basalt reinforcing is about a foreign as it could be. That is the purpose of this website - education! Basalt Technology (Pty) Ltd., in South Africa, is able to supply you, or your contractor, with the fibre mesh and the rebar (do not use steel rebar)! Our business is not constructing concrete walls, dome houses, or thin-skinned roads. We are importers, and suppliers, of basalt based materials, and we have the ability to present you with suitable technical advice, and support. It goes without saying that you can place your orders at "sales@stonerod.co.za".
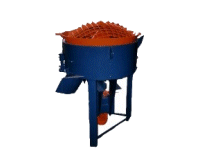
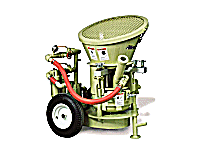
For spraying the shotcrete, you will need a suitable concrete mixer, and the PMSA V200 Pan Mixer is excellent in these operations. Get it with legs so it can sit directly over the concrete pump. You will need a mortar pump. In the USA they use a 220v hydraulically driven peristaltic pump. If you want to use a peristaltic pump, remember that absolutely thorough cleansing is required at each stoppage of work. Peristaltic pumps will not tolerate hardened concrete in the pumping section.
 |
 |
|
 |
 |
Regarding the spraying of the walls, in the booklet, because of the use of conventional rebar, the method of fixing the steel is described. When 25 mm x 25 mm mesh is used, the form can be sprayed with half the desired thickness. Then cut the mesh to manageable sizes and embed to mesh into the wet layer of mortar. Once the mesh has been placed, spray over the second layer to the correct depth, and finish appropriately. There is no need to tie the mesh to the shutters, as is required when using bars. Nor is it necessary to spray an extra coat, over the bars on the shutter face, once the shutters have been removed. Don't forget your form oil!
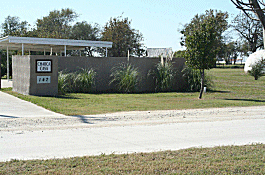
Trowelled walls and finishes
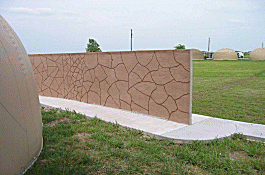
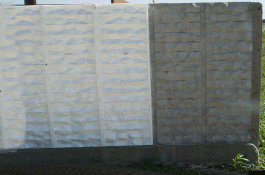
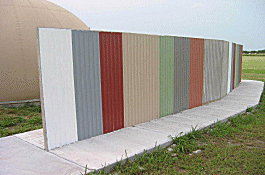
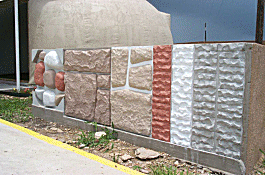
Different finishes and textures can be given to walls. There is the conventional, stippled finish of sprayed shotcrete (if you are spraying). If desired, the walls can be trowelled flat on the spraying side. Care must be exercised to get good, smooth joints on the formwork. Other finishes can be obtained by applying plastic, neoprene, or rubber formers to the shutter. There are a number of sources where these forms may be obtained. It is important to remember that your forms will need a form oil or release agent.
On the sprayed side, the finish may be imprinted using typical floor imprinting mats. A number of designs are available. the texture providers are fixed to the inside of the form, and given a light coat of release agent, before the spraying begins. In all cases, the correct release agents must be used to allow the shutters or moulds to be removed without creating surface damage.
If you want to construct your wall, using plastered mortars.
We have suggested that the walls should be sprayed by a competent shotcreter, or guniter. However, there is no reason to believe that trowelling the plaster mix onto the form, embedding the mesh, and then trowelling another thickness will not work. Of course it will. Just remember that to place shotcrete or gunite is a relatively fast operation. It will take quite some time to place the shutters. That is probably the most difficult operation as the shutters will determine the finish of the walls.
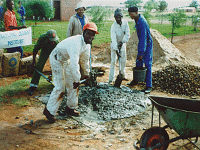
Should you decide to go the plastered wall route, get a good plasterer. That is your first priority. Then get a good mixing team. Please do not fall for the South African, tried and tested, method of making poor plaster. You may have seen it. The labourers make a massive heap of sand, break open paper sacks containing cement, (after they have provided half the supplied bags with "concealed legs", and provided directions, to help the stolen bags to get to the labourer's homes). They then proceed to mix the plaster. Yes! It is true! The mix only has half the required cement, and the amount that is mixed is enough for today and tomorrow. Just add water, when workability is lost! I hope most of you realise I'm being very tongue in cheek. All this is bad practice! Never RETEMPER plaster mixes. Re-tempering means adding additional water.
Most cases of poor plaster quality are due to bad on site practice. In tests, it has proved more effective to make smaller mixes, at regular intervals, throughout the day. it is suggested that the site make two mixing positions and as one mix has 10% remaining, start the next 2 sack of cement mix. In that way, the plasterer will be receiving fresh plaster all day, and the job is going to be much easier to complete correctly.
Mixing ratios.
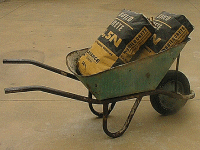
In South Africa, we have 50 kg sacks of Portland cement, and a builder's wheelbarrow holds 65 litres, which means TWO sacks of cement. For exterior plaster, please use CEM II 42.5 Portland cement. 2 x 50 kg cement sacks will fill one wheelbarrow with cement. For exterior plaster, you will need approximately 10 bags of cement and 1.5 m3, or 25 wheelbarrows of good plaster sand, (5 mixes) to produce 1 m3 of plaster. For 1 m2 of 50 mm thick wall (built up in 3 - 4 layers) you will need 50 litres of mixed plaster. (Without wastage). Do not buy the cheapest plaster sand, buy the best. You are building for eternity!
 |
 |
 |
 |
|
 |
 |
 |
 |
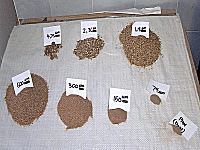
To calculate the materials required for a fence, take the length of the fence, in metres, (including the zigs and zags) and multiply the length by the height, in metres. That will produce the surface area of the fence, or wall. Because the desired thickness is 50 mm, the "absolute minimum" amount of mix that is going to be required is Length x Breadth x 50 litres without wastage. (1 m2 of area, covered by 1 mm, requires 1 litre of mix). In the previous paragraph, the mix was described for 1 m3 as being 10 50kg sacks of CEM II 42.5 Portland cement, and 1.5 m3 of the best plaster sand you can buy. Too much clay can be a problem.
Since, sand will determine the quality of the plaster, it is worth doing a simple test. Sands that contain too much clay will cause plaster to crack. The mortar being used for the wall is an external grade plaster. To assess whether sand is suitable this simple test may be used. Take 2,5 kg cement, and mix with 12,5 kg sand. If more than 3 litres of water is required to make a workable mix, then the sand is unlikely to be suitable for plaster work. Find another source!
What is a workable mix?
A simple test for plaster workability is to use the trowel test. To easily assess the workability of a plastering consistency mix, form a flattened heap of plaster, on a non-absorbent surface, about 100 mm high and 200 mm in diameter. Place a plasterer’s trowel, face down, onto the top of the heap, and try to push the trowel down. A workable mix will extrude (squeeze out) from under the trowel, as it is pushed down, and it should be possible to push the trowel to within a few millimetres of the bottom surface.
If the mix appears to be workable, lift some of the plaster on a trowel, then tilt the trowel sideways. The plaster should slide off easily. If it clings to the trowel the mix is too “fatty”, an indication of excessive clay content in the sand. The water demand test, mentioned above, should have warned that the sand was unsuitable.
If bad sand is used, an unworkable mix will result. The poor mix will “lock up” once the trowel has moved a few millimetres into the heap, and the lock-up will prevent further downward movement of the trowel. Water separating from the mix over a short period of time will indicate bleeding. This indicates that there is not sufficient fine material in the sand.
Unfortunately, there is always wastage. When calculating the wastage, allow at least 10% for spillage and loss.
After the plaster has been applied, scratch the surface of each layer of plaster, to provide a key for the next layer. Built up each layer, not placing more than 15 mm thickness of plaster, at one time. When the final plastered face has been achieved, cure the plaster. This is important when using cementitious materials. It is essential to protect the exposed faces from the sun and wind by covering it with a plastic sheet. Make sure that wind cannot tunnel under the plastic sheet. Keep the structure moist for a minimum of 7 days.
Enjoy your wall !
 |
We pride ourselves on our professional service, market knowledge, quality, and most competitive prices.
Return to Top of Page.